Captivate E-Learning Workflow Storyboarding
Here’s the second part in the Captivate Workflow series. It’s a fairly short one, nonetheless still very important in the process. If you missed the first one, about planning a Captivate e-learning workflow, you can find it here.
I’ve broken the process down into the following sub-topics:
- Planning
- Storyboarding
- Scripting
- Design Prototyping
- Functional Prototyping
- Asset Curation
- Assembly
- Testing
- Deployment
Captivate E-Learning Workflow
Click to view a larger image
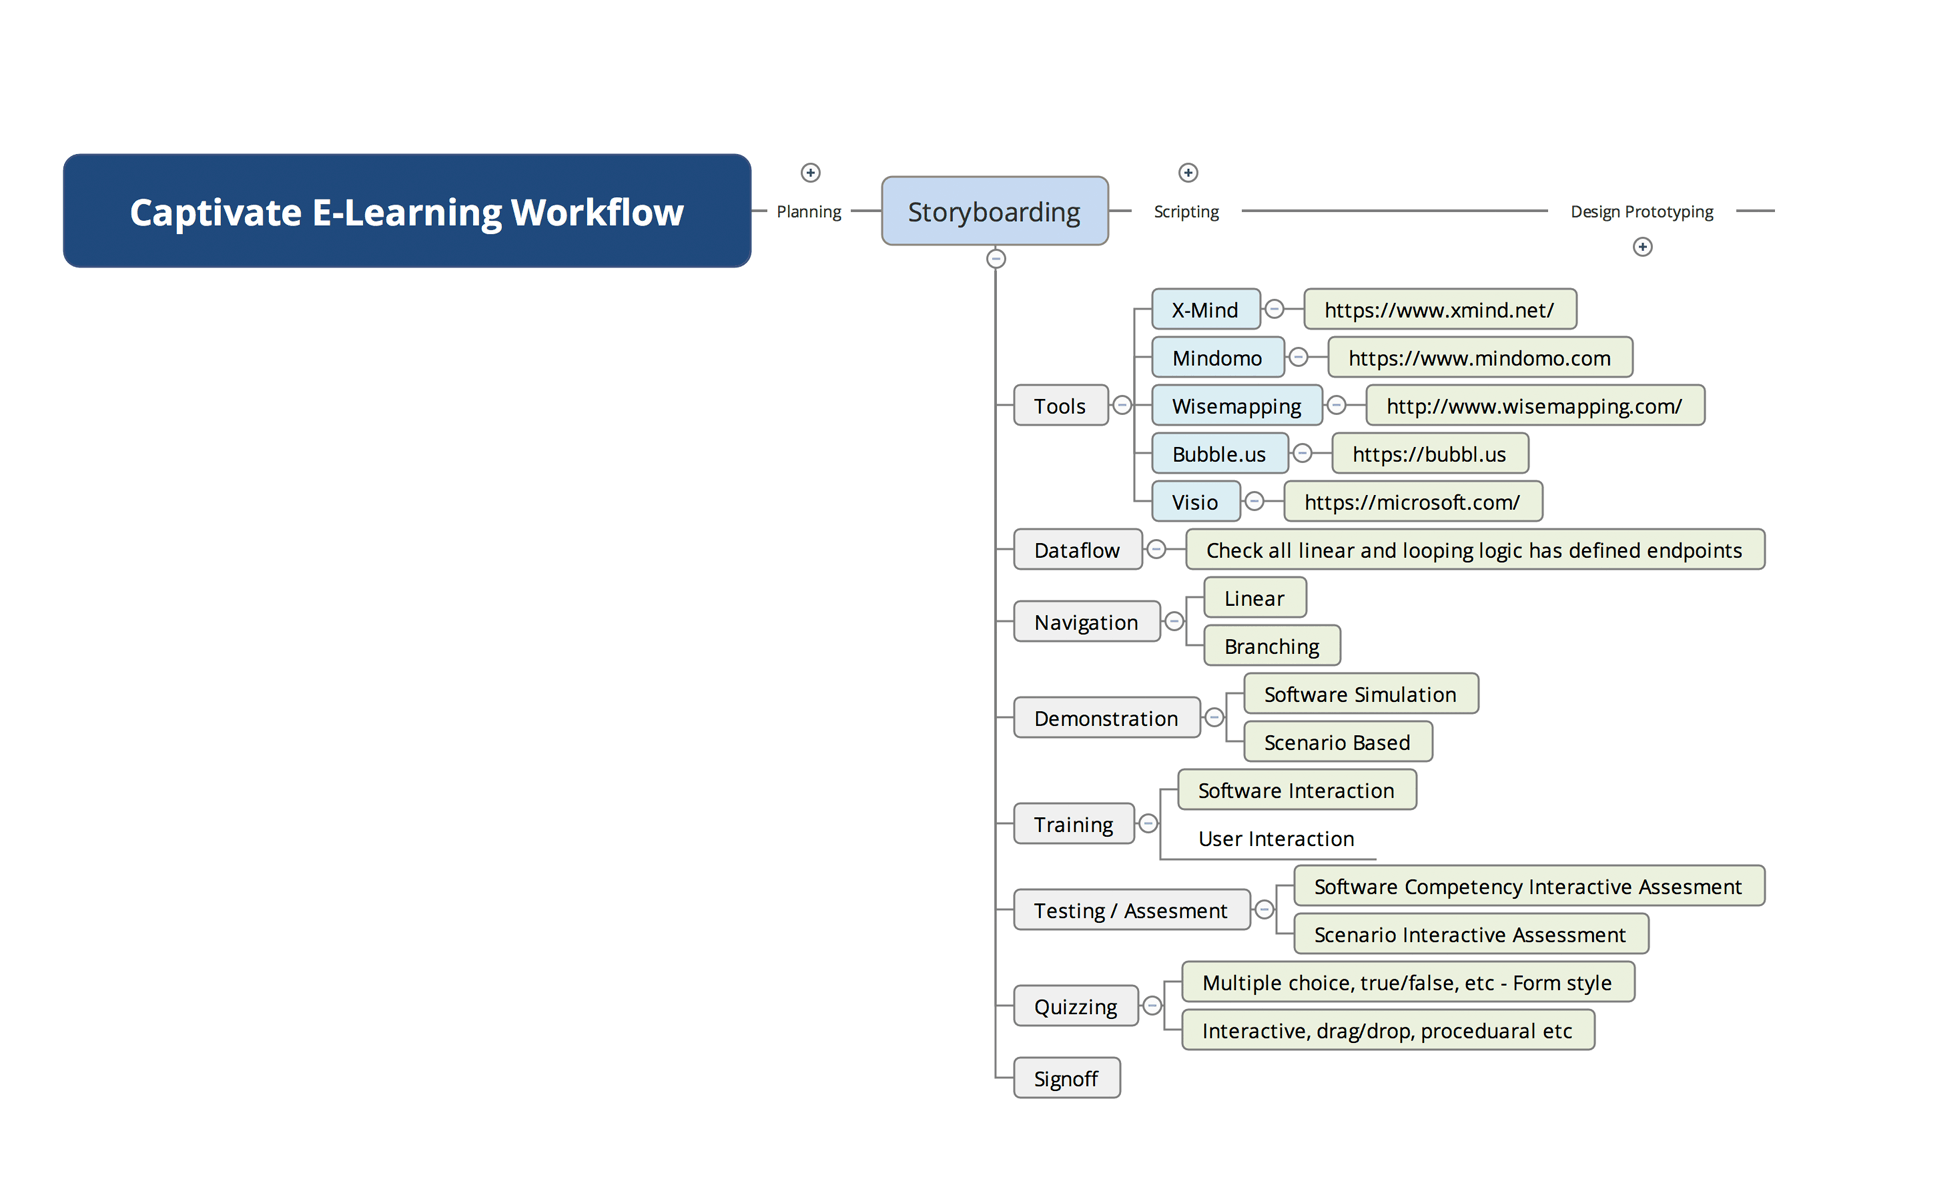
Storyboarding
Prerequisites:
If you’ve read my previous article about planning your E-Learning workflow, you’ll already have realised that it would be pointless starting your journey without a destination in mind!
So, by the time that you’re ready to start storyboarding your project, you have a clear idea in mind as to what your e-learning project goals are. You know what project learning outcomes are required and the way that you will measure the success.
You also know your end-user demographics, so you know the tone and language that you will have to use in order to engage them.
You also know about the technical aspects of delivering your e-learning programme to your end-users. Whether they’re going to be using desktop computers, mobile devices or tablets, and also if there may be limitations on bandwidth.

Storyboarding:
Tools

There’s no hard and fast rule about what tools to use when developing your e-learning product – operating systems, software, hardware etc, except for the fact that they should serve you in the most efficient and consistent manner. You should use what works for you and your team, and not be scared to change if the goalposts move, or you find something better. Personally, I’ve been using a Macintosh operating system for years and am comfortable with it, but also have Windows, Unix and Linux systems too for appropriate work. I use most of the Adobe applications because they work for me. I use Adobe Captivate because it provides a solid, extendable and integrated development environment which allows me to deliver highly engaging E-Learning experiences that satisfy the most complex requirements.
As far as storyboarding tools go, you could just as easily use Post-it notes, a whiteboard, or anything that works for you. My tool of choice is X-Mind – an open-source software tool that works on most operating systems. There’s a free and a paid version available. Other tools such as Mindomo, Wisemapping, Bubble, Freemind and even the ubiquitous Visio from Microsoft will work just as well.
Dataflow
Some people, particularly those that have plenty of experience in instructional design, will start their storyboarding using the tools that they intend on publishing with – Powerpoint, Captivate, Articulate etc. And although all these tools allow for the user to add notes to each scene/slide/frame, I still believe that an abstract approach is more feasible. Why? because switching logic around and re-routing the flow of the project needs to be more flexible than the linear approach that most of these tools provide.
Granted, all the e-learning development tools mentioned allow for a non-linear navigation process, but that arrangement is not immediately visible unless navigation elements and process events are exposed and diagnosed. It’s much easier to have all of that immediately available by using a more visible workflow. Hence the use of the tools I mentioned in the previous section.
Navigation

A typical linear approach to e-learning development might include simple ‘next’ and ‘previous’ buttons on the interface, but I’ve found that most clients prefer a more non-linear environment.

A Table of Contents or main menu which allows users to pick the parts of the project that they want to view is extremely useful, but it’s important to note that this may impact on learning outcomes because it may possibly allow them to skip mission-critical content.
A better approach may be to allow them to see what is available in the project, but not allow them to navigate to a section directly without having seen the previous required content. Thankfully in Captivate, this is fairly easy to implement.
Many e-learning development tools also include a progress bar at the base or side of the e-learning container, often with a sliding marker or forward/back buttons which allows for independent movement within the project. Typically, I don’t enable this feature, allowing me to completely control the users’ pathway.
I’ve also found that keeping a user informed of their progress through a project is important – they need to know that they are making progress!
Demonstration

I would presume that you follow a standard learning workflow; where you first of all inform the student what’s going to happen and why, followed by a demonstration, then some workshopping where they experiment, then an assessment of some kind, concluding with a section where the mapped goals are shown to have been covered along with access to re-training.
The demonstration could be something like a software simulation, where all the steps required are shown in a clear and logical manner. Feedback on elements that are clicked, fields that are filled in, or keys that are pressed should be clear, unambiguous, and presented with timing that is neither rushed nor sluggish. Reference to the user demographics should indicate how this is presented.
A situational demonstration could include infographics, on-site photographs or video where the procedures are detailed and the expectations for competence explained. Text overlays or audio can always help to reinforce these concepts.
Training
Once a student has been shown the process and at this point would be expected to have understood the purpose of the exercise, it’s time for them to have a bit of a play to see if they can implement what they’ve learnt.
In a software simulation scenario, you’ll want to try and make the training exercise as close to identical to the real-world environment as you can. However, it’s important that you give your trainees a bit of a helping hand if they start to stray off the path. The best way to do this is to give visual and/or audio feedback as they move around the interface. As they roll over an active area, consider presenting a hint as a pop-up message, perhaps with a sound attached. Incorrect actions/clicks/keypresses etc should also trigger error messages in the same way, with encouraging overtones.
Live scenarios are obviously more difficult to enact in an e-learning environment, but if the demonstration section of the module was correctly framed, trainees should be well aware that this is the case. For instance, it’s unlikely that a vehicle-driving simulation could ever replace the action of physically driving a car, however it’s an acceptable replacement for training purposes.
Nonetheless, images, audio and video combined with interactive elements can provide a rich environment in which trainees can learn about the task at hand, and provide solid feedback to the e-learning reporting system.
Testing / Assessment
Typically the way that you’d assess a student’s competency would be to set them a similar (but not identical) task to the ones covered within the demonstration and training sections of your e-learning module. I suggest the non-identical approach because all too often trainees can memorise answers without retaining the logic behind the answer. This can result in false-positives and skew training analytics as well as practical outcomes.
Exercises where the trainee interacts in a way that fits intuitively into a defined workflow will always result in not only better analytics and KPIs, but also have a much better chance of embedding routines and natural logic – with longer-term benefits.
Exercises where there is little challenge risk being sidelined by the trainee and will engender apathetic responses. This position is difficult to recover from. Better research and planning could prevent this.
Quizzing
Although quizzing is a part of an e-learning assessment experience, it’s often set apart from the more engaging and interactive section by the typical user interface presented. Multiple-choice questions with checkboxes, true/false questions with radio buttons, fill-in-the-blank questions etc. All basically form elements which present mainly text-based questions in a fairly dry format.
Personally I find this kind of competency assessment dull and boring, but I feel that in some cases, it really is the only way to present the information. It is important, however, to ensure that the presentation of possible answers is set in a random fashion, and also the questions themselves should be drawn from a pool of questions on identical topics. This makes sure that trainees can’t pass on answers accurately to other participants, and also ensures that higher levels of competency are achieved.
 | © 2014 John Ryan Design | All Rights Reserved | 100 percent Australian |